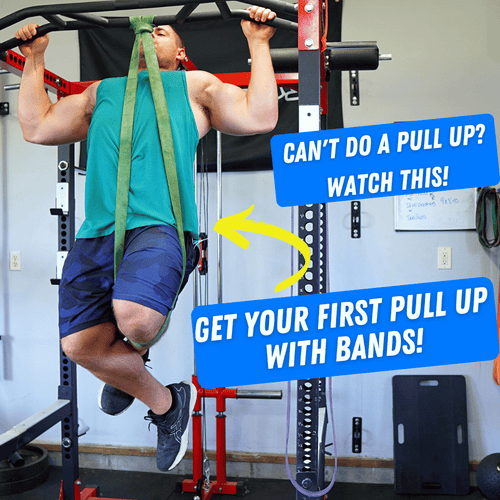
How to Use Resistance Bands for Pull-Ups and Build Strength
Posted by BRANDON FALKENBERG on

Introduction:
Pull-ups are an excellent exercise for building upper body strength, targeting muscles like the back, biceps, forearms, and grip strength. However, if you're unable to do pull-ups yet, resistance bands can be a helpful tool to assist you in achieving your first pull-up and gradually building the necessary strength. In this blog post, we will guide you through different pull-up grips, selecting the right resistance band, setting up the bands, and progressing towards unassisted pull-ups.
Pull-Up Grips:
There are various pull-up grips you can use depending on your preferences and the muscles you want to target:
- Wide Grip: Place your hands beyond shoulder width apart. This grip primarily targets the lat muscles and offers less leverage with other muscle groups.
- Shoulder Width Grip: Keep your hands shoulder width apart. This grip engages the biceps, lats, and upper back muscles.
- Chin-Up Grip: Use an underhand grip with palms facing towards you. This grip emphasizes bicep involvement and is generally considered the easiest pull-up variation.
Using Resistance Bands:
Resistance bands provide assistance by subtracting a portion of your body weight, allowing you to execute proper pull-up reps and gradually build strength. Here's how to use resistance bands for pull-ups:
- Choosing the Right Band: Select a band that offers approximately 30% to 50% of your body weight in resistance. This range ensures that you can perform around 12 to 15 good-quality pull-up reps. The Clench Fitness website provides a range of resistance bands to choose from.
- Setting Up the Bands: Wrap the band around the pull-up bar and tie a slip knot. There are two ways to attach the band to yourself:
- Knee Attachment: If your pull-up bar is low or you have a short pull-up bar, wrap the band around your knee to get the least assistance.
- Foot Attachment: For taller pull-up bars, stretch the band lower and step into it to receive more assistance.
- Using Multiple Bands: If you require more assistance, you can either ask a partner for help or use two smaller bands instead of one larger band. This method allows you to adjust the assistance level accordingly.
Progression and Building Strength:
To progress from using bands to unassisted pull-ups, follow this workout routine:
- Warm-up Set: Start with a band that allows you to comfortably perform 10 to 15 reps as a warm-up, using controlled and fluid movements.
- Second Set: Decrease the band tension and aim for 6 to 10 reps. Focus on maintaining control throughout the movement.
- Final Set: Reduce the band tension further, targeting 3 to 5 challenging reps. Ensure you execute these reps with a slow and controlled motion, emphasizing a strong contraction at the top and a brief pause at the bottom.
- Weekly Routine: Incorporate this pull-up workout at least once a week, gradually aiming to increase the number of reps or reduce the band resistance. The more frequently you perform these workouts, the faster you will progress.
- Additional Strength Training: To enhance your pull-up strength, incorporate exercises like lat pull-downs, bent-over rows, bicep curls, deadlifts, and other rowing maneuvers. Focus on lifting heavy weights to build the necessary strength in the target muscles.
Conclusion:
Using resistance bands for pull-ups is an effective way to develop the strength required to perform unassisted pull-ups. By understanding different pull-up grips, selecting the appropriate resistance band, setting up the bands correctly, and following a progressive routine, you can gradually build your strength and achieve your first bodyweight pull-up. Remember to challenge yourself and try to beat what you did in the previous workout!

